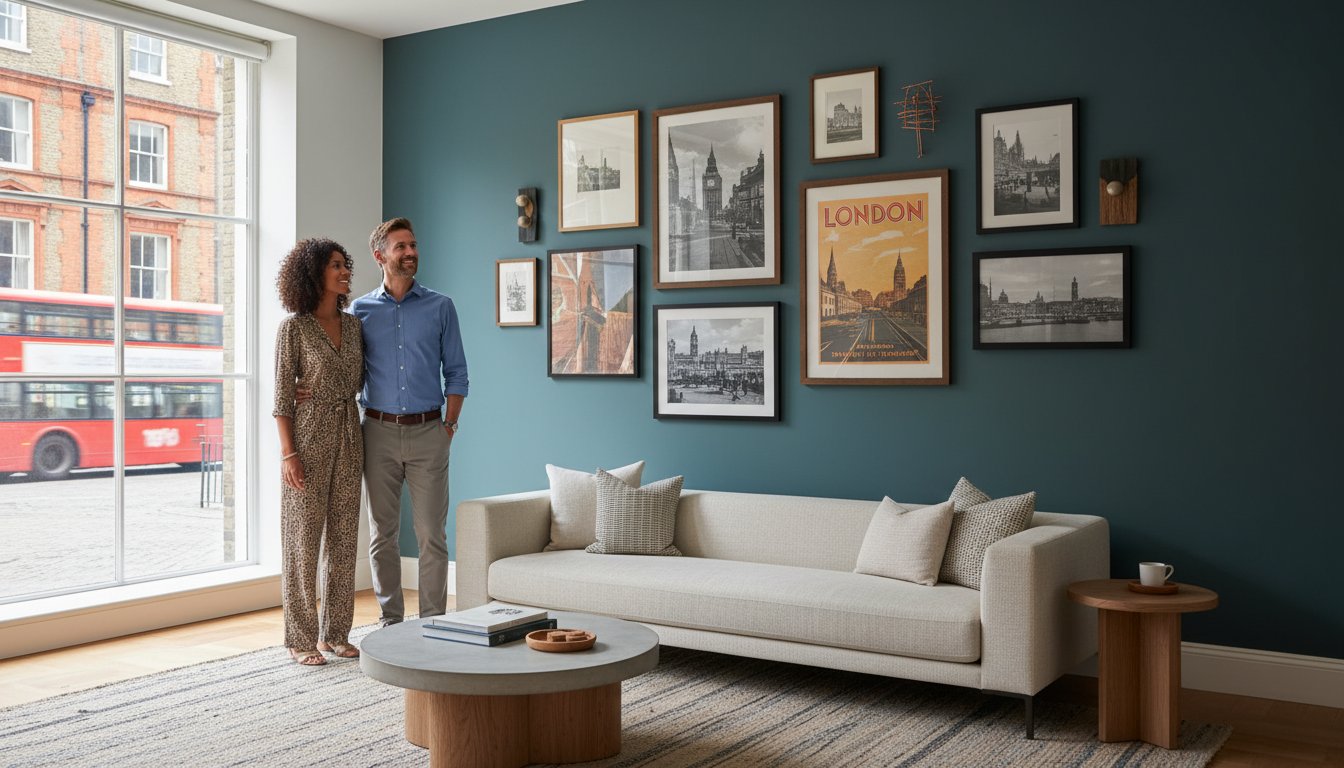
A piece of photographic history should never be held hostage by a single, optimistic nail. Whether you are displaying a grand Slim Aarons landscape or a bespoke Terry O’Neill portrait, understanding how to hang heavy framed art is essential to protecting your investment. You have likely felt that familiar pang of anxiety while holding a substantial frame against your wall, wondering if the structure will yield to the weight of the glass and timber. It’s a valid concern; a standard nail in drywall typically supports only 5 to 10 pounds, which is far below the requirements for the world’s finest photography.
We agree that the safety of an archival print is paramount, and a pristine wall shouldn’t be sacrificed to trial and error. This curator’s guide promises to replace that uncertainty with professional precision, offering the technical clarity needed for a secure, level, and museum-quality result. We will explore the structural importance of 16-inch stud spacing, the mechanics of toggle bolts that support up to 50 pounds, and the refined elegance of the French cleat system to ensure your collection remains a permanent part of your home’s heritage.
Key Takeaways
- Understand the structural nuances of your wall substrate to ensure it can support the significant “pull” of a bespoke, gallery-grade frame.
- Discover how to hang heavy framed art using the French cleat method, a sophisticated engineering choice that distributes weight evenly across a horizontal plane.
- Implement the professional “painter’s tape” technique for marking walls, preserving your home’s aesthetic while ensuring pinpoint accuracy for hardware placement.
- Master the “Centerline Rule” to position your photography at the precise 145cm height favored by international galleries for an effortless eye-level perspective.
- Learn how artisanal mounting and bespoke framing from our London workshop provide the necessary structural integrity for displaying the world’s finest photography.
The Curatorial Assessment: Evaluating Weight and Wall Substrate
The arrival of a large-format archival print is a significant milestone for any collector, yet the physical presence of a bespoke frame often brings an unexpected weight. While a standard retail frame might feel inconsequential, a gallery-grade piece from our London workshop carries the gravity of its artisanal construction. Mastering how to hang heavy framed art requires a shift in perspective; you aren’t merely placing a decoration, you’re engineering a permanent installation. The first step in this process is a cold, clinical assessment of the object’s mass and the surface that will support it.
Distinguishing between static weight and the “pull” on a wall is vital. While a frame might weigh 20 kilograms when held, the leverage it exerts once mounted can significantly increase the stress on your hardware. We recommend using a digital scale for an absolute reading rather than relying on an estimate. Knowing how to hang heavy framed art with precision is the hallmark of a professional display, and knowing the exact poundage allows you to select anchors with a safety factor of four, ensuring the work remains secure for decades. To identify your wall type, use the “tap test.” A hollow, resonant sound indicates drywall or plasterboard, while a dull, solid thud suggests masonry or brick. Each requires a fundamentally different approach to ensure the safety of your photographic investment.
Understanding Frame Construction and Weight
The choice of materials in bespoke framing directly dictates the mounting requirements. Solid hardwoods, such as oak or walnut, provide a timeless aesthetic and structural rigidity, but they add substantial poundage compared to hollow or composite mouldings. The selection of glazing also plays a critical role. Archival glass, while offering unparalleled clarity and protection for a silver gelatin print, is significantly heavier than acrylic alternatives. The depth of the frame also shifts the center of gravity; deeper “box” frames exert more outward leverage, often necessitating a French cleat system to distribute the weight across multiple points of contact rather than a single, stressed hook.
Wall Substrate: Drywall, Plaster, or Brick?
Your wall’s internal structure is the silent partner in your art display. Modern drywall, typically 12.5mm thick, has inherent limitations; it’s designed for aesthetics rather than load-bearing. For pieces exceeding 10 pounds, you must locate the wooden studs, which are usually spaced 16 inches apart in contemporary builds. Period properties often feature lath and plaster, which is notoriously brittle and prone to cracking under the vibration of a drill. In such cases, the stability of solid brick or concrete is a luxury, allowing for the use of masonry anchors that can support the most ambitious oversized works, such as the grand vistas found in the Slim Aarons collection, without the fear of structural failure.
Beyond traditional paper prints, some collectors are exploring high-quality photography printed directly onto birch wood for a more organic, artisanal aesthetic. These substantial pieces often look best when displayed on specialized, heavy-duty wall shelves from WoodSnap, which provide the necessary structural support for their unique weight and profile.
Hardware Selection: Beyond the Standard Picture Hook
Hardware is the silent foundation of your gallery. While a standard picture hook might suffice for a lightweight print, the substantial mass of a hand-crafted frame requires a more sophisticated engineering solution. Relying on inadequate fasteners is a risk that few serious collectors are willing to take. Understanding the mechanics of these fasteners is vital for anyone mastering how to hang heavy framed art with professional confidence.
The traditional wire hanging method, though common, is often unsuitable for very heavy, large-format pieces. Wire creates a single point of failure and exerts a constant inward “pull” on the frame’s vertical members, which can lead to warping over time. It also encourages the “lean,” where the top of the frame pulls away from the wall, disrupting the clean lines of a curated space. Instead, professional installers favor hardware that distributes weight across a wider horizontal plane, ensuring the artwork remains safely and securely anchored to the building’s structure.
The French Cleat: The Museum Standard
The interlocking “Z-bar” design of a French cleat is the gold standard for high-end displays. This system utilizes two beveled strips of aluminum or wood; one is mounted to the wall and the other is integrated into the back of the frame. When they interlock, the weight is distributed evenly across the entire width of the cleat, providing unparalleled stability. Cleats are the premier choice for fine art photography that requires a flush-to-wall finish. To size your cleat correctly, select a length that is approximately 75% of the frame’s width, ensuring it remains hidden while providing maximum support. Our bespoke framing service can ensure your pieces are prepared for this professional mounting method from the moment they leave our London darkroom.
Heavy-Duty Anchors for Drywall
If you cannot locate a structural stud, specialized anchors are your only defense. In the debate between Snapskrus and toggle bolts, the latter is the superior choice for significant weight. A metal toggle bolt can support between 25 and 50 pounds in plaster, while plastic versions typically hold 10 to 25 pounds. It’s a fundamental rule of curatorial safety to divide the rated load of any anchor by four. If an anchor is rated for 100 pounds, it should only be trusted to support a 25-pound frame. Understanding these hardware ratings is a cornerstone of knowing how to hang heavy framed art without compromising the integrity of your walls. For oversized works, always aim to secure at least one side of your hardware into a structural 16-inch spaced stud to provide a solid anchor point that drywall alone cannot offer.
How to Hang Heavy Art: A Step-by-Step Execution
The transition from a curated collection in a gallery to a permanent installation in your home requires a ritual of precision. Execution is where curatorial theory meets the physical reality of your architecture. When you are ready to learn how to hang heavy framed art, you must approach the task with a measured pace, ensuring every measurement is verified before a single hole is made. This process protects the structural integrity of your home and the archival quality of your investment.
Begin by measuring the “drop” of your hardware. This is the vertical distance from the top edge of the frame to the point where the hanging bracket or cleat actually sits. Once you have determined your desired eye-level height, apply a strip of low-tack painter’s tape to the wall. Mark your measurements directly onto the tape rather than the substrate. This technique avoids unsightly pencil marks on your finish and provides a clear guide for your pilot holes. Precision at this stage prevents the frustration of a misaligned display that requires multiple attempts to correct.
Finding and Utilizing Wall Studs
For substantial pieces, such as those from our Star Wars Limited Edition or Cinema Lobby Card collections, securing your hardware into the building’s skeleton is the only way to ensure lasting safety. A stud is the vertical framing member of a wall. In most modern properties, these timber supports are spaced 16 inches apart. Use a high-quality stud finder to locate these points of maximum strength. If your desired placement falls between two studs, you can “bridge” the gap by mounting a horizontal wooden support or a wide French cleat that spans both vertical members, distributing the load across a broader section of the wall’s frame.
The Drill and Anchor Process
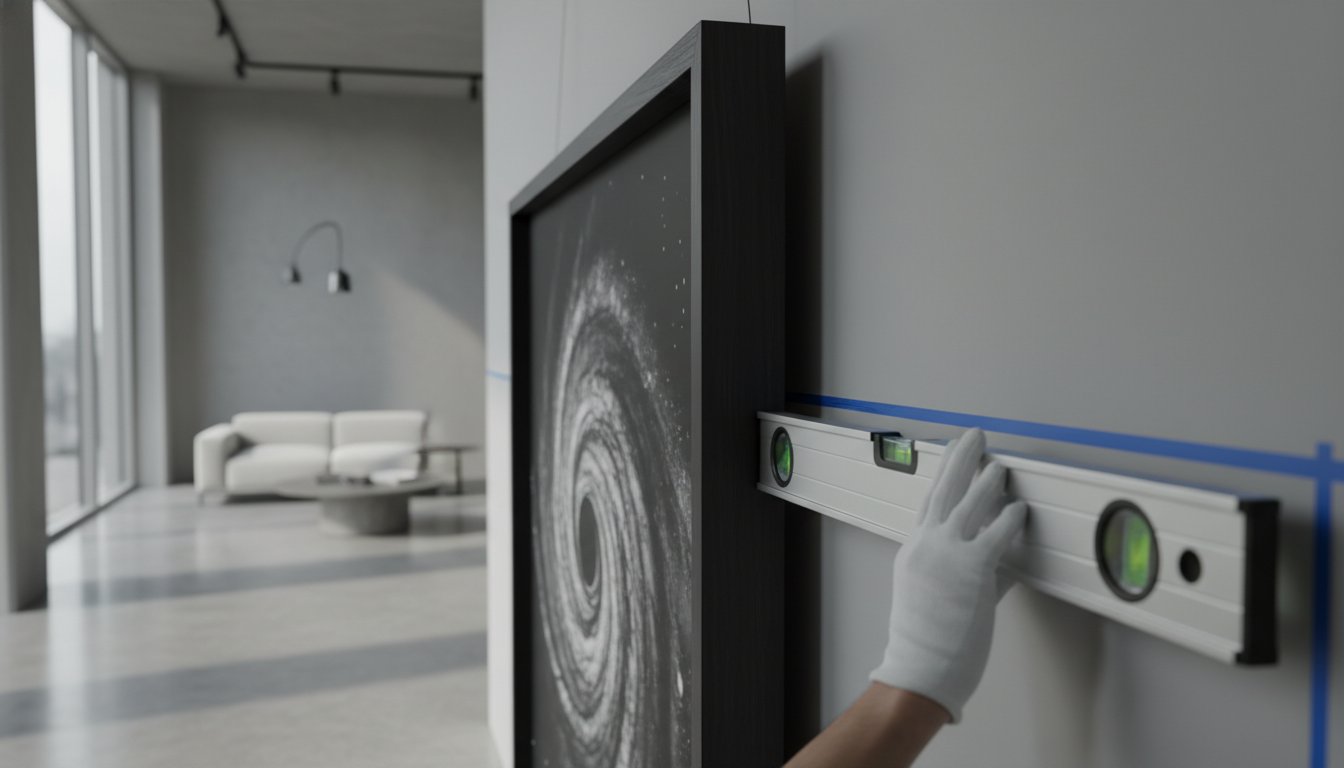
Precision drilling is the cornerstone of a secure mount. Always start with a small pilot hole to verify the wall’s interior before committing to a larger heavy-duty anchor. Your drill bit must match the specific diameter required by your hardware to ensure a snug, secure fit. Consult a professional hardware guide by weight to confirm your chosen toggle or plug is rated for the mass of your bespoke frame. Ensure the anchor sits perfectly flush against the wall surface; any protrusion will cause the frame to tilt forward, breaking the clean, gallery-style silhouette. When driving the final screw, avoid over-torquing, as this can strip the substrate and compromise the anchor’s grip.
The final step is the “two-point” leveling check. Place your level across the top of the frame, and then verify the vertical alignment along the side. A heavy frame that is even a fraction of a degree off-center will exert uneven pressure on your hardware over time. Achieving horizontal perfection ensures that the focus remains entirely on the evocative power of the photography, rather than the mechanics of the display.
Achieving the Gallery Aesthetic: Leveling and Spacing
The visual impact of a masterpiece depends entirely on its placement within the room’s architecture. Once you have mastered the technicalities of how to hang heavy framed art, the focus shifts to the curatorial nuances that define a professional display. A common error in private collections is hanging work too high, which severs the connection between the viewer and the image. To replicate the atmosphere of a world-class institution, we adhere to the “Centerline” rule. This principle dictates that the horizontal center of the artwork should sit exactly 145cm (57 inches) from the floor, a height that approximates the average human eye level and creates a harmonious rhythm across the wall.
Spacing for impact is equally critical when integrating a substantial piece into a curated collection. A heavy frame requires visual breathing room to avoid overwhelming the surrounding decor. If you are displaying multiple works, maintain a consistent gap of 5cm to 8cm between frames to create a cohesive narrative. Lighting also plays a pivotal role; position your heavy, glazed art away from direct windows to minimize glare on the archival surface. This preserves the exquisite depth of the silver gelatin process and ensures the hand-printed details remain the focal point of the room.
The Science of Eye-Level Hanging
Calculating the midline is particularly vital for expansive works, such as a grand Slim Aarons print capturing the poolside glamour of the mid-century elite. To find this point, divide the total height of the frame by two and add this number to your hardware’s “drop” measurement. While the 145cm rule is a foundational guide, adjustments are sometimes necessary. If the piece is positioned above a sideboard or mantel, ensure there is a 15cm to 25cm gap to provide appropriate clearance. In rooms with exceptionally high ceilings, you might find that heavy art looks more grounded when placed slightly lower than the mathematical center, allowing the weight of the frame to anchor the space.
Stability and Finishing Touches
A secure mount is only the beginning; the final presentation requires attention to the physical relationship between the frame and the wall. Heavy pieces are prone to “the lean,” where the top of the frame pulls away from the substrate. To prevent this, ensure your hardware is mounted as high as possible on the frame’s reverse. We also recommend placing adhesive rubber “bumpers” on the bottom corners. These small additions protect your wall from scuffs, promote airflow to prevent moisture buildup behind archival glass, and help keep the piece perfectly parallel to the wall.
When performing the final level check, discard smartphone apps in favor of a traditional 4-foot spirit level. The increased length of a physical level provides a more accurate reading across the wide span of an oversized frame. Verify that the frame is seated correctly on its cleat or hook, ensuring the weight is fully supported before releasing your grip. If you’re looking to expand your collection with pieces that demand this level of care, browse our curated music and cinema archives to find your next investment. Ensuring the frame is seated correctly is the final step in a journey that begins in our London darkroom and ends with a timeless addition to your home.
The Galerie Prints Standard: Bespoke Framing for Lasting Security
The journey of a masterpiece doesn’t end when the shutter clicks or when the print leaves the darkroom. For the serious collector, understanding how to hang heavy framed art begins with the structural integrity of the frame itself. At Galerie Prints, we view the frame not merely as a decorative border, but as a protective exoskeleton. A poorly constructed frame can flex under its own weight, putting undue stress on the glass and the archival print within. Our approach ensures that the technical challenge of mounting significant works is met with a foundation of artisanal strength.
Every piece that leaves our London darkroom is a testament to the golden age of glamour, but it’s also a feat of modern engineering. We believe that the world’s finest photography deserves a presentation that is both evocative and enduring. By prioritizing the physical architecture of the display, we ensure that the technical knowledge of how to hang heavy framed art is supported by the very best materials. This commitment to quality provides the peace of mind necessary to enjoy your collection without the lingering fear of structural failure.
Bespoke Framing as a Structural Asset
Our bespoke framing service utilizes solid wood mouldings, such as premium oak and walnut, which provide a stable and rigid foundation for heavy-duty hardware. Unlike composite materials that can crumble under the pressure of a toggle bolt or screw, solid timber grips the fasteners with authority. We integrate archival-grade backboards into every build to prevent the warping that often plagues lesser frames over time. For our largest formats, we specifically recommend and prepare the frame for a French cleat system, ensuring the weight is distributed across the timber’s grain rather than pulling against a single point of tension.
Investing in Photographic Heritage
When you acquire a silver gelatin print or a limited edition Slim Aarons vista, you’re becoming a guardian of photographic heritage. The process from original negative to a securely mounted masterpiece is one of meticulous care. This level of attention is especially critical for the timeless allure of black and white pictures, where the depth of the blacks and the crispness of the whites must be protected from the environmental stresses of an improper mount. A secure display isn’t just about safety; it’s about honoring the artist’s legacy by ensuring the work is presented exactly as intended, for generations to come.
Your home is your personal gallery, a space where history and modern aesthetics converge. By following professional curatorial standards and choosing frames built for longevity, you transform a simple wall into a stable stage for iconic imagery. If you’re ready to elevate your interior with a piece that combines historical significance with structural excellence, we invite you to explore our curated collections and bespoke framing options. Let us help you bridge the gap between the golden age of cinema and the enduring beauty of a perfectly mounted display.
Elevating Your Private Gallery with Curatorial Precision
Mastering the technical nuances of how to hang heavy framed art transforms a simple room into a curated sanctuary. By prioritizing structural assessments and employing museum-grade hardware such as the French cleat, you ensure your investment remains a permanent fixture of your home’s narrative. You’ve learned that the secret to a professional display lies in the intersection of engineering and aesthetics, from the 145cm centerline rule to the meticulous precision of a pilot hole. These steps protect both your walls and the historical provenance of the work you display.
At Galerie Prints, we provide the foundation for this excellence. Every piece is hand-printed in our London darkroom using museum-quality archival materials, ensuring the longevity of your photographic heritage. As specialists in the Slim Aarons Archive and iconic music photography, we understand that a bespoke frame is more than a decorative border; it’s a structural asset designed for stability. We invite you to Browse the World’s Finest Photography and Bespoke Framing to find a piece that speaks to your passion. With the right hardware and a discerning eye, your walls will reflect the timeless glamour and evocative power of the world’s most iconic imagery.
Frequently Asked Questions
Can I hang a heavy picture on drywall without a stud?
Yes, you can secure substantial pieces to drywall without a stud, but you must use specialized hollow-wall anchors such as toggle bolts or molly bolts. While a standard nail might only support 5 pounds, a metal toggle bolt can hold up to 50 pounds by spreading the weight behind the plasterboard. It’s vital to ensure the drywall itself is in good condition and at least 12.5mm thick to prevent the substrate from crumbling under the pressure.
How much weight can a standard picture hook actually hold?
A standard nail-in picture hook is typically rated for 5 to 10 pounds in drywall. While some heavy-duty branded hooks claim to support up to 100 pounds, these ratings are often based on ideal conditions and perfect installations. For the safety of your archival collection, we recommend a conservative approach; always choose hardware with a weight rating significantly higher than the actual mass of your frame.
What is the best hardware for hanging a 20kg framed print?
For a 20kg piece, the most secure option is a French cleat system or heavy-duty toggle bolts anchored into structural studs. When you are determining how to hang heavy framed art of this magnitude, weight distribution is your priority. A cleat allows the 20kg load to be spread across a wide horizontal area, which prevents the concentrated stress that can cause single hooks to fail or pull out of the wall.
How do I prevent my heavy frame from tilting forward?
To keep a heavy frame flush against the wall, mount your hanging hardware as high as possible on the back of the frame. This reduces the leverage that causes the top of the piece to pull away from the substrate. Additionally, placing adhesive rubber bumpers on the bottom corners of the frame creates a slight offset that keeps the entire piece parallel to the wall while promoting archival-friendly airflow.
Is it better to use two hooks or one for a heavy piece?
Two hooks are always superior to one for heavy art because they halve the weight load on each anchor point and provide much better leveling stability. Spacing two hooks approximately one-third of the frame’s width apart prevents the “seesaw” effect. This dual-point system ensures that once the piece is level, it’s far less likely to shift or become crooked due to vibrations or cleaning.
Do I need a special drill for hanging art on a brick wall?
Yes, you must use a hammer drill equipped with a tungsten-carbide masonry bit to penetrate solid brick or concrete safely. Standard drill bits are designed for timber or metal and will dull almost instantly against masonry. Once the hole is drilled, you’ll need to insert a plastic or metal wall plug that expands when the screw is driven in, creating the friction necessary to hold the weight.
How do I hang a heavy mirror or art piece without damaging the wall?
The key to minimizing damage is precision; use painter’s tape to mark your drill points and choose high-capacity anchors that require the smallest possible holes. Using a single, high-quality toggle bolt is often less damaging than drilling multiple “trial and error” holes with smaller, inadequate nails. When the art is eventually moved, these professional anchor holes are easily patched with a small amount of filler.
What is a French cleat and when should I use one?
A French cleat is a pair of interlocking beveled brackets where one half is secured to the wall and the other to the frame. You should use this system for oversized photography or heavy mirrors that require a flush, museum-quality finish. It’s the preferred method for our largest bespoke frames because it provides a level of security and horizontal alignment that traditional hooks simply cannot match.